Almost weekend. I am really looking forward to it. My plans?
Today some drinks with friends, maybe afterwords go out for dinner with them. On Sunday I am going with some girlfriends to Blue Jasmine, by Woody Allen. I have heard great reviews about it. Have you seen it yet?
But tomorrow, tomorrow I am going to do just absolutely everything and nothing... just enjoy my horse and dogs (walks and riding) and afterwords with a hot cup of tea, a blanket and a good book and just dream away!
I received some great mails about my previous blog - which had some amazing simple tips that work (by New York professional photographer Peter Hurley). So when I came across these tips, I also wanted to share them with you. If you want to combine all the tips it does take a little practice ... I sometimes try them out when I am in my car stuck in a traffic jam - perfect place - although it must look weird to the person in the car next to me ;).
The following tips are by Ben Thomas, he wrote this for photographers ... but if you are "the subject" also a great tutorial:
1. Lift the Arm
When people stand naturally, another thing they do is stand with their arms flat at their sides. This causes several problems. First, it makes them look awkward and uncomfortable in the photo. Secondly, their arm presses against their torso. This squishes the arm out and makes it look larger than it actually is.
You can correct that by having them just lift their arm an inch or two so it is "floating" and not pressed against them. Alternatively, you can pose their hand so the arm is in a different position, such as putting their hand on the hip. In the image above, the red line is the size of the arm when standing unposed. The exact same red line was moved over to the second photo so you can see how much smaller the arm becomes when not pressed against the body.
2. Leave Visual Space by the Waist
Everyone loves looking thin. One of the things you can do to trim down your subject is by giving them their "natural" waist, without any additives. What I mean by that is visually isolating the skinny part of the torso so they look as thin as they are. I had my model put her hands on her hips. The first photo shows no further posing. The arm in the back has no space between it and the torso, so it visually extends her mid-section. By having her pull the arm a little forward, you can see the space, so the waist doesn't have anything adding visual bulk.
The red line shows the visual width of the subject from the first photo. It is replicated in the second photo to show how much width the arm actually adds. This rule does not just apply to arms. Anything that will be in the background of your subject and make them look larger can be an offender. A few examples are other people, tree trunks, or light poles.
3. Turn the Shoulders
This is a very simple tip, but important. If your subject stares at the camera head-on, they look bigger. This can be good when shooting a football player or CEO of a big company, but it is bad when shooting beauty or portraits. By having your subject turn, they are showing a slimmer profile of themselves to the camera, and look slimmer.
The red line shows the full width of the model when standing straight forward. A small turn to the side gives a photo that is still the subject facing the camera, but in a slimmer profile.
4. Don't Show the Whites of the Eyes
When you want a far off, dreamy look and choose to have your subject look off camera, do not tell them to "look over there." Give them an object behind you to focus on so you can control their eyeline.
The first photo, I told the model to look out the door next to us. You can see the majority of the white of her eye, which is a bad thing. You want to see the iris, the colored part. I had her look out the window next to the door. That small change in eyeline brings back her eyes, gets rid of the white part, and gives a more attractive portrait.
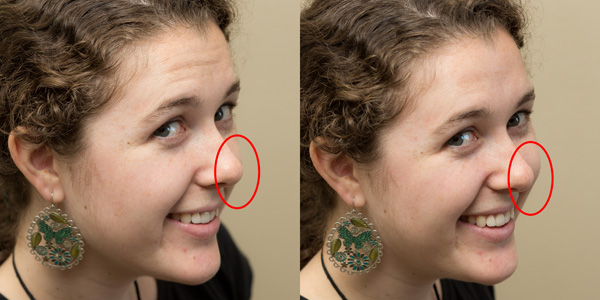
5. Don't Let the Nose Break the Face
This one is a bit more complex, but still important. When you don't want your subject facing forward, you have them turn to the side. Assuming you don't want a full profile where you only see one side of the face, they will be at a quarter turn with both eyes in frame. If you draw an imaginary line down the side of their face, this line is the line that cannot be crossed by their nose.
If they turn too far and the nose crosses this line, it "breaks" the natural curve of the face. It creates the "pinocchio" effect and extends the length of their nose. You can avoid this by having them turn back toward you slightly, until you can see a little bit of space between the end of their nose, and the side of their face. You don't want to break that line or it makes them look like they have disproportionate facial features.
Bringing it All Together
Here's a checklist you can follow for your next shoot.